Avatar 3.0/Expressions
Expressions are what replace emotes and gestures in Avatar 3.0. They are significantly different than in Avatar 2.0.
The way emotes and gestures worked previously, one would have a custom animation that would override another. For example, if one wanted to bind an animation to the thumbs-up gesture, one would use an override controller to replace the THUMBSUP animation with the custom one. While simple, this created problems, which Avatar 3.0 tries to fix with a more complex, yet accessible system.
In Avatar 3.0, much more of the underlying Unity animation systems are exposed, such as the controller and node graph. Animations are placed in playable layers, so that animations can be blended together, and be affected by priorities.
Parameters
Parameters allow you to trigger animations based on what is currently going on in terms of avatar movement, positioning, speech visemes, gestures, or even whether your headset is on or off.
Parameters are provided as named variables, and are case-sensitive. For example, AFK will work, but not afk. A list of built-in parameters are listed below.
| Name | Description | Type | Sync |
|---|---|---|---|
IsLocal
|
Is the avatar being tested locally? | Boolean | None |
Viseme
|
Oculus viseme index (0-14). Jawbone/flap range is 0-100, indicating volume | Int | Speech |
GestureLeft
|
Gesture from left hand control (0-7) | Int | IK |
GestureRight
|
Gesture from right hand control (0-7) | Int | IK |
GestureLeftWeight
|
Analog trigger from left hand control (0.0-1.0) | Float | IK |
GestureRightWeight
|
Analog trigger from right hand control (0.0-1.0) | Float | IK |
AngularY
|
Angular velocity on the Y axis | Float | IK |
VelocityX
|
Velocity on the X axis (m/s) | Float | IK |
VelocityY
|
Velocity on the Y axis (m/s) | Float | IK |
VelocityZ
|
Velocity on the Y axis (m/s) | Float | IK |
Upright
|
How crouched you are, 0-1 | Float | IK |
Grounded
|
If you're touching ground | Bool | IK |
Seated
|
If you're in station | Bool | IK |
AFK
|
If player is unavailable (HMD proximity/End key) | Bool | IK |
Expression1
|
User defined. 0-255 if Int, -1 - 1 if Float | Int/Float | IK or Playable |
| ... | |||
Expression16
|
Gesture Values
| Value | Meaning |
|---|---|
| 0 | No Gesture |
| 1 | Fist |
| 2 | Hand Open |
| 3 | Finger Point |
| 4 | Victory |
| 5 | Rock 'n' Roll |
| 6 | Hand Gun |
| 7 | Thumb Up |
Playable Layers
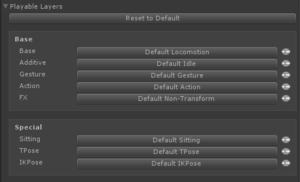
Base
The base layer affects how your avatar looks like walking, jumping, etc. Generally, you don't want to change this unless your avatar has problems in these specific cases.
Additive
Additive allows you to apply animations that blend with your base animations. One popular example is a breathing animation.
Gesture
This layer allows you define traditional hand gestures. This layer allows you to affect other limbs using a masking system (telling the animation system which limbs you wish to use). Body parts that are not masked off would continue doing normal (base + additive) animations.
This layer can also do non-humanoid animations, like ear-twitches.
Action
These animations completely override what the rest of your animations are doing, much like how the old gestures and emotes used to.
FX
Advanced animations, such as blendshape magic, can be done here. You should not use these for animating hand bones, etc.
Special
Sitting
Appears to allow setting up animations for sitting down. Undocumented otherwise.
TPose
Probably does stuff while in calibration/TPose?
IKPose
Probably does stuff while in calibration/TPose?
Components
VRCExpressionsMenu
This component is used to define a menu that is displayed on the wheel menu. These menus can be nested, and can contain buttons and controls.
VRCExpressionParams
Expression Parameter components allow you to define variables that can be adjusted by controls on the VRCExpressionsMenus. These variables can also trigger animations when they change and meet a set of conditions you define.
Basics Tutorial (Gestures)
Making a Blendshape Animation (Optional)

- Ensure your Animation window/tab is visible. (Window > Animation > Animation or CTRL+6)
- I recommend dragging the tab next to your console tab to reduce clutter.
- Duplicate your avatar in the scene graph. (Right-click, Duplicate)
- Disable the original avatar so you don't break it by accident.
- Back up your project, just in case.
- Select the duplicate avatar in your scene graph.
- Open the Animation tab.
- Select Create.
- Save as desired, although it is recommended to save to a dedicated Animations folder with your avatar files.
- Modify the blendshapes and/or bones to taste.
- NOTE: You no longer have to do hand bone animations when modifying blendshapes.
- NOTE: For facial expressions or looping animations, just record 1 keyframe a second keyframe isn't necessary.
- Once you're satisfied, delete the duplicate avatar.
Creating your Controller
- Create a folder for your controller.
- Recommended: [Avatar] > Expressions > Controllers
- Right-click the folder.
- Create > Animator Controller.
- Name it something useful, such as [Avatar] Gestures.
- Open it by double-clicking on it.
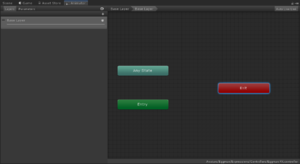
You are now presented with a flow graph. To move around, use middle-mouse, and zoom with your scroll wheel.
You can think of an Animation Controller like a flow chart: You start at the Entry when the avatar is loaded, and in most games, Exit would exit the animation controller. (VRChat will just loop back to Entry instead.) Any State allows you to link to nodes from any other part of the graph. So, for instance, you could be in the middle of sitting down and still be able to trigger states from stuff linked to Any State.
Creating a Layer for your Animations
In order to add your animations, you need to add a layer. A layer is basically how animations are blended together in Unity: Each layer is like a transparent sheet of plastic that holds an animation, and, when combined with other animations, makes up the entire animation state of your avatar, such as locomotion and gestures.
Layers are listed on the left pane of the Animator.
- Open the animator you want to create a new layer in.
- Click the
 button (left side, near the top of the sidebar).
 - Fill in an appropriate and descriptive name for your layer. For this example, use Gestures.
- Hit enter.
You will also want to click the gear icon next to your layer, and change the weight from 0 to 1. This will ensure the animation plays at maximum strength over any other animations.
The action layer requires you to have each layer start at 0, add the VRC Playable Layer Control to each of your states and let that blend your states to 1.
Adding the Animation to the Layer
Now, you need to add the animation to the layer. Your animation can be represented as a state, which is shown on the graph as a block with lines (transitions) connecting it to other states.
- Right-click somewhere on the graph (preferably next to Entry).
- Select Create State > Entry.
- Click New State.
- Change its state to something memorable, like Landing or Do Nothing. This state is where the animation state machine will sit while we wait to trigger it. We'll refer to this as the landing state, for now.
- Now drag the animation you want to trigger onto the grid next to it. Let's call this your animation state.
Adding Parameters to the Animator
We need to link to the VRChat parameters in order to use them in our animator.
As an example, we will use GestureLeft. Why? Because I am left-handed and screw you.
- Click on the parameters tab on your Animator.
- Click on the
 button next to the search bar.
 - Select Int.
- Type in
GestureLeft. This is case-sensitive. - Leave the default parameter at
0. (No gesture)
Setting Up Transitions
Now we set up the condition for transitioning to the animation state. We'll use a left-handed Rock 'n' Roll gesture (5) to trigger it.
- Right-click on the landing state.
- Select Make Transition.
- Click on your animation state to finish connecting them.
- Click on the transition line.
- Click on the
 button under Conditions.
 - The first parameter you added will automatically be filled in. In our case, this is
GestureLeft. If it's not something you want to trigger with, select something else. - Select Equals from the dropdown.
- Enter
5for the value. - To ensure transitions are snappy and responsive, uncheck Has Exit Time. You can adjust this, and the Exit Time value, to crossfade between animations when you feel like it down the road, but for now, we'll disable it.
You now have a transition that will let you go to the animation state when GestureLeft is 5.
Now, we need to go back to landing when we do any other gesture.
- Create a new transition from your animation state returning back to your landing state.
- Create a new condition in your return transition.
- Set the parameter to be
GestureLeft. - Select NotEqual from the dropdown.
- Enter
5as the value. - Uncheck Has Exit Time.
Adding the Gesture Controller to your Avatar
Now we need to chuck the new controller into your avatar.
- Select your avatar in the scene graph.
- Expand Playable Layers.
- Select Customize, if you haven't already.
- Select Default Gesture.
- Drag your Gestures controller into the Gesture box.
Dances Tutorial (Menus)
You will need a loopable dancing animation for this tutorial.
Creating a Parameters Collection for your Avatar
- Create a folder for parameters.
- Recommended: [Avatar] > Expressions > Parameters
- Right-click the folder.
- Select Create > VRChat > Avatars > Expression Parameters
- Name it something memorable.
- Recommended: [Avatar] Params
- Open your avatar in the scene graph.
- Under expressions, press the Customize button.
- Drag the newly-created Expression Parameters object from your assets tree to the Parameters box.
Adding a Dance Parameter
We need to keep track of which dance we're currently playing. 0 will be no current dance.
- Open your avatar's parameters by double-clicking on the Parameters box.
- Add an Int called
CurrentDance. - Set the value to 0.
Adding a Menu
- Create a directory for menus. You will need it.
- Recommended: [Avatar] > Expressions > Menus
- Right-click the directory.
- Select Create > VRChat > Avatars > Expressions Menu.
- Rename it something memorable, such as [Avatar] Root Menu.
- In the Inspector, ensure Active Avatar selects the desired avatar.
- Select Add Control.
- Expand New Control.
- Set the name to something relevant and meaningful.
- Set the type to Toggle (since this is a looping animation).
- Set the Parameter to CurrentDance, Int (from the dropdown).
- Set the Value to
1.- You can set other dance animations to any other integer.
- Drag your new root menu into Expressions > Menu on your avatar.
Duplicating the Default Actions Controller
We're going to steal and maim the VRCSDK default Actions controller to achieve our aims, but we're going to duplicate it so we don't break the original.
- Find vrc_AvatarV3ActionLayer in your project. It'll be somewhere under VRCSDK.
- Select it.
- Press CTRL+D to duplicate it.
- Drag the duplicate to your Controllers folder.
- Rename it to [Avatar] Actions.
- Drag it into your Playable Layers > Action slot.
- Open it and brace yourself.
WTF Am I Looking At
The first thing you'll see is a mess.
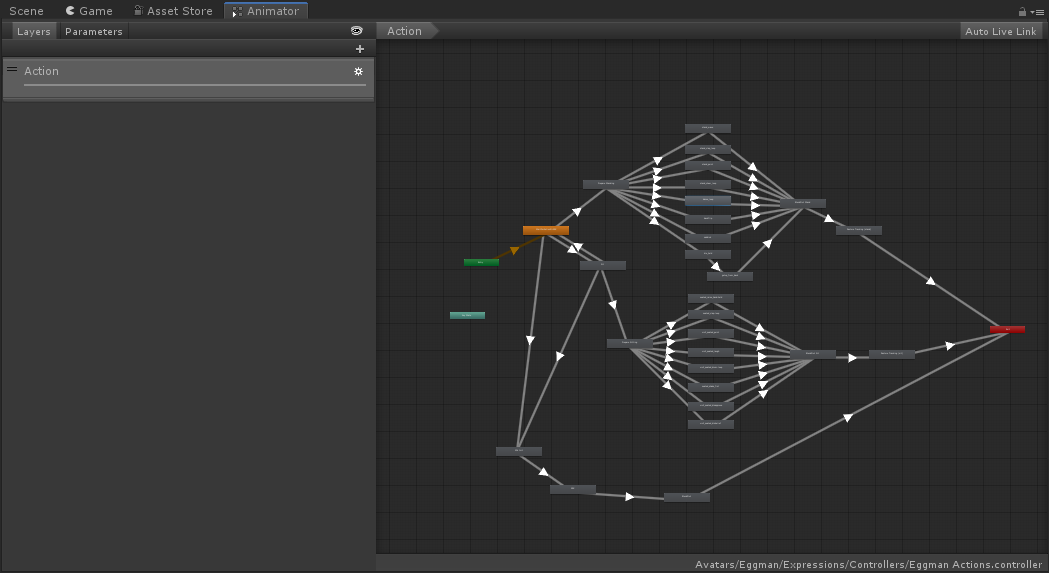
First things first: Don't panic. This is actually simpler than it looks.
Let's break it down.
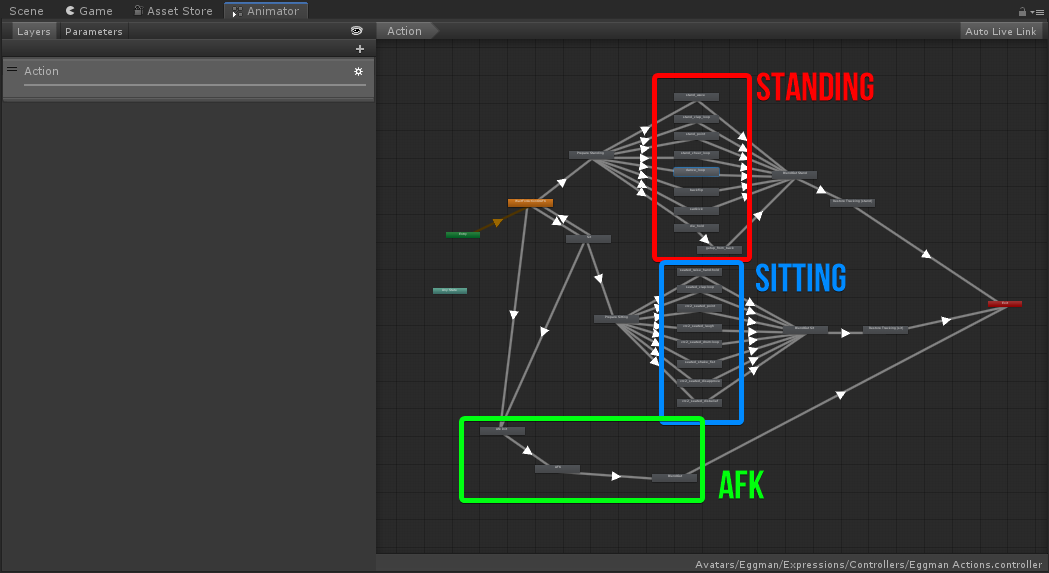
As you can see, the Actions controller is comprised of 3 functional groups:
- Standing actions
- Sitting actions
- AFK actions
The flow is like this:
- The state machine is parked at the orange landing state.
- It goes to one of transition states to handle transition animations.
- Based on parameters, it moves to either the sitting or standing set of animations. By default, they're duplicates of their counterparts in the other groups.
- After the return conditions are met, the state machine moves to another set of transition states.
- Finally, it exits, and returns to Entry.
What we're going to be doing is adding in a new group for our dances.
Creating Your Prepare State
We want to get the avatar ready to dance by standing it up. Since we already do this for our standing animations, let's copy the Prepare Standing state, but trigger it differently so it correctly handles our dance animations.
- Right-click Prepare Standing.
- Select Copy.
- Right-click somewhere near WaitForActionOrAFK.
- Select Paste.
- Rename Prepare Standing 0 to Prepare Dancing.
- Create a new transition from WaitForActionOrAFK to Prepare Dancing.
- Uncheck Has Exit Time.
- Change Settings > Transition Duration to
0. - Add a condition set to
CurrentDanceGreater0.
- Add a transition from Prepare Dancing to your animation state.
- Uncheck Has Exit Time.
- Add a condition set to
CurrentDanceEquals1.
Adding your Dance Loops
We're going to make this a standing animation.
- Add your dance parameter to Parameters.
- Go back to the Layers tab.
- Drag your animation to the grid, near Prepare Standing.
- Right-click Prepare Standing.
- Select Make Transition.
- Click on your dance animation.
- Add a condition to the transition
- Set it to CurrentDance Equals 1
- Uncheck Has Exit Time so the transition is instant.
- Add another transition from your animation to BlendOut Stand.
- Set the condition to
CurrentDanceNotEqual 1. This will drop you out of the animation if you select another dance or untoggle the dance.- For a non-looping animation, do not set a condition.
- Uncheck Has Exit Time.
- For a non-looping animation, leave Has Exit Time checked, and set Settings > Exit Time such that you start blending out of the animation at an appropriate time.
You should now be ready to roll.
