Sometimes, you'll get a model that has some weird things going on.
Examples:
You get a Blender project with procedural materials. This won't work with external software like Unity or Substance.
A model you just got from a seller (or ripped from a game) has 15 materials for some reason. This looks great, but isn't performant.
You acquired a model that cleverly uses overlaid UV islands to get lots of detail out of a small UV map. Again, it looks great, but you can't bake AO or worldspace normals in Substance when it uses overlays.
Warning:This tutorial was made with Blender 3.3.1 on Windows. Your Mileage May Vary.
While you can use the CATS plugin to do something similar, CATS tends to break a lot, especially when new Blender versions come out. It's essential to know how to perform this operation and understand how it works under the hood without using tools like CATS.
Situation
For this tutorial, I will be using a fully-modelled and textured Death Egg from Sonic Generations (I think) that I use as a prop in ChilloutVR.
Death Egg, with baked AO, emissions, and worldspace normals.
While it has base color, emissives, and normals, I'd like to import it into Substance Painter to bake AO and do touch-up. Unfortunately, the UV map is chock-full of overlays, so the textures, emissives, and normals need to be baked onto a clean, packed UV map.
WHY
Making a new UV Map
First, we need to make a new UV map to render to. Don't worry, if you're happy with your UV map already, this will just duplicate it. Just follow along.
In Object Mode, select the model.
Click the Object Data Properties tab.
Expand the UV Maps section.
Click the + button to add a new UV Map.
Name it something like "UVMap 2". We'll be using that name in this tutorial.
Now, reorganize UVMap 2 to your heart's content.
I used Seams to Islands, created a 4096x4096 texture, selected UVMap 2, and repacked everything with UVPackmaster.
Freshly packed.
Shading Node Setup
Now we need to create some stuff to tell Blender what to render to. If you're happy with your shading nodes, this will not mess with them.
Select the model we'll be shading.
At the top of the screen, select the Shading tab.
At the bottom of the screen, you'll see a spaghetti graph with a bunch of nodes linked by noodles. This is the Shader Editor.
Adjusting the old shader
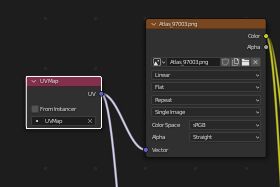
We don't want the old shader to get confused now that there are two UV maps, so let's explicitly tell it which one to use,
At the top of the Shader Editor, click Add > Search...
Search for UV Map and click it when found to create a new UV Map node.
Drag the new UV Map node to the left of your existing shader spaghetti.
In the dropdown at the bottom of the new node, select your old UV Map (usually named UVMap by default)
How to set up the old UV map node.Click on the dot next to the UV output and drag it to an existing Vector input on an existing Image Texture node.
Repeat the previous step for all your pre-existing Image Textures, and anything else needing UV input. You only need one UV Map node for all of your old image texture UV inputs.
Render Textures
Now we need to create and configure the textures we bake into.
For the Death Egg, we need three: one for base color, one for emissives, and one for normals.
Create a UV Map node.
Select UVMap 2.
Create three new Image Texture nodes. For each image texture:
Click the + button to create a new image texture.
Name the new image texture something like "Baked Albedo", "Baked Normals", "Baked Emissives".
Change the size to whatever size you want to use. I use 4K textures, so I set the size of all of my textures to 4096x4096.
Connect the UV output from UVMap 2 to the node's Vector input.
Render Settings
From the tutorials I've seen thus far, Eevee does not support baking to texture, so we have to change to Cycles. We must also tweak a few things.
Click the Render Properties tab on the right sidebar.
At the top, change Render Engine to Cycles.
Change device to CPU. Yes, even if you have ten 4090 Ti's given to you by God himself. GPU baking is still buggy.
Expand the Bake section.
Make sure Output > Target is set to Image Textures, and that Clear Image is on.
I recommend setting Margin > Type to Adjacent Faces.
SAVE AND BACK UP YOUR FOLDER, JUST IN CASE.
Baking a Pretty Bake
Now for the fun part.
Emissives
We do emissives first, since they're the easiest.
Select the model.
Select the Baked Emissives image texture node.
Change Bake Type on the sidebar to Emit.
Press the bake button. Progress will be at the bottom of the window.
Normals
Select the model.
Select the Baked Normals image texture node.
Change Bake Type on the sidebar to Normal.
Press Bake.
Base Color
This is a bit trickier because Blender doesn't let you just bake base color, as it'll try to combine shadows and other information. So, we'll bake it as an emissive.
Select the model.
Select the Baked Albedo image texture node.
Change Bake Type to Emit.
In your Shader Editor, connect whatever produces your base color to Emission.
Bake.
Restore the previous connection to emit, or CTRL-right-click and drag through the noodle to cut it.


 Object Data Properties tab.

 Render Properties tab on the right sidebar.