Optimizing your avatar or world or 3D asset is a massively important part of the avatar creation process. In general, increasing the render efficiency of your avatar means that it has less impact on your, and other people's framerates.
VRChat has performance ratings, but these are only rough guides to actual optimisation. They're not that bad when you actually understand optimization, but this article will focus on one thing: Reducing the time it takes for your avatar to render. It is definitely possible to make an 'Excellent' avatar that is godawful, or a 'Very Poor' avatar that's extremely performant; at the extremes, but even at middling values it only records the totality of the avatar and does not represent what the avatar is like during render time. With Avatar 3.0 and lots of toggles it has become increasingly unrepresentative.
tl;dr Optimise down to what you need.
The Process
Actually working on optimizing your avatar will be a balancing act between how many shits you give, what kind of environment you expect to use the avatar in, and how many features you want.
It's recommended to focus your efforts on making appropriate avatars, rather than min-maxing optimisation every time. For example, an avatar you're going to use in a crowded instance you will definitely want to optimise as much as you can, else you'll be performance blocked and no-one will see your cute avatar. For instances where it's just a few people... or just two people.... then you can basically not optimise at all and be fine. Plus, some optimisaiton is harder than others. For most avatars doing the quick wins can get you a lot of extra frames for little effort.
Optimisation covers both blender and unity since the final asset is built in both. Some things are kind of blended between editors.
Focus areas:
Number of distinct mesh objects (GPU/CPU)
Vertex Count (number of polygons) (GPU)
Texture Size (GPU - VRAM)
Material Quantity (GPU/CPU)
Shader settings (GPU)
Use of Blendshapes on high poly-count meshes (GPU)
Number of bones (GPU)
Physbones (previously dynamic bones) count (CPU)
Constraints once they hit a high enough number (CPU)
Number of animator controller layers (CPU)
Other crap added (particles, Lights, etc) (GPU/CPU)
The main render/resources to be focused on are:
VRAM / RAM usage
GPU Frametime / Framerate (How long the avatar actually takes your GPU to render)
CPU Frametime (How long the CPU takes to go through all the avatar's logic and drawcalls and shit)
Download size
Using a tool like XSOverlay or vrfps you can see your GPU/CPU frametimes broken down and identify bottlenecks. It's recommended to check this out for world optimization too; worlds often have a lot of Udon prefabs that eat CPU times or even cause frametime spikes. The concept of frametimes is important to optimising for VR and gives more useful data than just FPS. Simply put the frametime is how long a frame takes to render. Your computer takes the input data and renders each frame, and the longer it takes, the longer the frametime. The average is the FPS, but you could have 59 frames that take basically no time, and then one frame that takes half a second, and the FPS meter will say 60 but it will feel like 2. This is more important for worlds, as with avatars the frame delivery is more consistent.
Unity Rendering tidbits
Understanding how unity renders things is important. Details may be in the focus areas but in general:
Inactive game objects contribute to file size and VRAM/RAM usage, but if they are deactivated they are not rendering and do not effect frame times.
Unity treats the VRAM and RAM as a sort of hybrid cache; the takeaway is that assets from inactive game objects get moved to RAM after a while, but pulling shit from RAM to VRAM is still slower than pulling from VRAM to present something onto the screen. Larger the inactive game objects, the larger the lag spike when the game object is toggled on.
Textures are uncompressed in VRAM. Texture size is the single largest overriding factor in VRAM usage.
Focus Areas
These should be roughly sorted by ease of optimisation. Removal tends to be the most efficient optimisation for any part of an avatar.
Other Crap added (Particles, Lights, etc)
Reduce these as much as possible, basically. Easy to optimise since you have to go out of your way to add these things.
For the Dynamic Penetration System, this uses lights to coordinate mesh bending.
If they're turned off they won't do anything though. Optimise by leaving them OFF by default, and try not to leave them on accidentally.
Remove from optimised avatars
Using Pumkin's tools - open the pumkins tools tab, load your avatar into the tool, and look for the "delete all" options. Or look through your avatar for particles and other items and remove them.
If using a prefab, they'll typically be on a toggle so you can check the toggles to indicate what you should remove.
Leave off when not in use
Shader settings
Generally: don't use effects you don't need, and try and use the same shader as much as possible. Shaders are basically code that runs on your GPU and the fancier the effect the longer it takes. GPUs are fast at running them so you honestly don't need to worry about performant shaders much at all.
Except in a few cases like reflection probes, grab passes, and computational heavy stuff that usually has to do with light bendingy and lensy type effects. Grabpasses, geometry shaders, extra passes and tessellation are usually the biggest offenders of shaders being laggy.
Don't be scared from using shader effects and material maps and caps and such, they're pretty and not that bad at all. Normal maps and mat caps were developed as faster ways to render detail than polygons or fancy lighting effects, after all.
Access the shader settings through the material settings. Conceptually, a material is the shader, as the shader is just code that runs that decides how the mesh is rendered. Multiple ways to do this:
For External materials, the settings can be found by locating the material in the project folders, and clicking on it to make it appear in the inspector. Remember you can lock a tab to the current thing; since clicking around happens quite a lot.
The settings can also be found in the mesh object. If you select a mesh object in your scene, there will be a drop-down menu for each material that is applied to that mesh.
Process
Avoid using heavy shaders like ones with transparent grab passes.
A transparent grab pass has to pause all rendering to render what is behind the transparent object. While this is useful for things like lenses and other light refraction type effects, it is an effect that is expensive to render time.
Performance: Opaque > cutout > transparent
Leave (back) culling on if you can. Nobody actually needs to see your nipples from the inside.
Using maps, cutouts, speculars, etc etc all have a minor performance draw
funny poiyomi effects also have a small impact
Number of bones
More bones = more shit that the game has to calculate when you move around. To optimise, reduce the amount of superfluous bones.
Performance impact from this is low for just having bones that exist; but pretty high for bones that will have physbones attached to them. Long chains of lots of little bones are bad for performance.
Minimal effort: Delete bones you aren't using. For example you deleted a skirt mesh, get rid of the bones too.
Low effort: Use CATS to merge the bones. Merging them with CATS will take the weights from one bone and merge them into the other, and delete one of the bones.
Find Model Options > Merge Weights.
Select the bone you want to merge and remove; then use ctrl-click to select another bone. Then hit Merge Weights - To Active. Or select one bone and hit 'To Parents' to merge it to the parent. This is most useful for reducing the amount of bones in a chain; some hair has a million bones and even with physbones it's overkill.
Reduce Bone count by deletion or merging
Physbones / Dynamic Bones
Performance wise, Physbones aren't too expensive nowadays since they got way more efficient to run once they replaced Dynamic Bones. However, everything has its limit and if you have loads of physbones you're going to be eating CPU cycles to run them.
The performance ranking splits this up into physbone components, physbone transforms and colliders. The components are how many physbone 'configurations' you have on your avatar; in unity the thing attached to the bone or object is the component. The transform count would be how many bones are actually under the influence of a component. Colliders are bounding areas in which physbones interact with.
You can reduce the number of components by using less. This involves combining those that can be combined; for example it's common to have separate components per breast (I'd actually recommend this in most cases as it allows each breast to be grabbed at the same time), or for each strand of hair, or each skirt bone, or something ridiculous. For hair, or a skirt, you can create a root object that all the skirt bones attach to, and then putting the component on that. The component will transform all child bones of the root bone affected.
Reduce components by combining under a root bone
Root bone can be added in blender or unity, but adding it in blender reduces unity workload.
The only real way to reduce transforms is either to remove the physbone entirely, or merge bones, as described above in the reducing bones section. Long chains of small bones can be merged into a chain of larger bones to improve performance.
Reduce colliders by... reducing colliders. There's no real way around it.
Consider if a constraint can achieve a similar effect.
Constraints
Constraints allow you to move one bone with another. When applied as a component to a bone, you can pair that bone's movement with another bone. For example:
Sunglasses that you take off the head; a constraint can stick the glasses to the head while you wear them, and a constraint can stick them to the hand so you can take them off. Same for a gun or other object.
Constraining skirt flappy bits to the legs; so when the legs move up, the skirt moves up out of the way. No colliders needed, reduces physbones.
LOADS more. The power of constraints is honestly untapped.
Constraining the finger rotation with toe rotation so you can wiggle toes
Second set of arms
The catch with constraints is that while they are way more efficient than physbones or colliders; there's a global limit to how many you can use per instance not per avatar. For some mythical unity reason, when the number of constraints running at once in a unity game goes over a certain number, the performance cost just skyrockets. VRC quotes this number at 683. Other studies show around 750-800.
Use them
But not too many - Consider ~100 to be your avatar limit.
Number of Animator Controller Layers
The number of layers in your animator does actually matter when it comes to performance. Quite a lot. Generally don't worry at all about it under 5 layers; but if you start to make loads of layers you can save significant performance by reducing them down. additionally, weight 0 layers take up CPU time and that's a unity bug.
ANY state transitions also use some CPU time but after some benchmarking using Thry's tool I found that the number of layers matters more.
Cut them down a lot for special versions for events like dances; there will be a lot of people in a small space and you need every frame you can get. Animator layers use CPU, and this is at a premium in VRC since even the highest end processors still choke on VRC mapmakers and avatar creator's horrendous bloat.
Try not to do more than 5 layers
Zero weight layers still count
For events like dances, remove everything but the bare essentials.
Duplicate and strip down larger FX layers for reduced functionality models
Special note about VRC update to Unity 2022: Unity 2022 fixes the bug where vertices unaffected by shapekeys still impact performance, so in the 2022 update (in beta at time of writing) you probably don't need to split meshes for shapekey optimization.
Shapekeys work by recording the difference on every single vertex between one state and the other and interpolating between them for the partial shapekey activation effects. This actually takes additional processing power
and gets more difficult the more vertexes there are - Even if they are UNUSED in the shapekey. IE; have one 70k mesh and move one vertex in a shapekey and it performs the same as if you'd moved all of them. (This is a unity bug)
Facial gestures in VRC are usually done with shapekeys on the face. If the entire avatar is just one mesh, each time the shapekey is used the GPU has to calculate positions for every single vertex in the entire avatar, clothing and all - not just the face. This is why you make or keep the face seperate - the facial gestures are activated often and cause a performance drain if there are lots of polygons.
Keep in mind that If the avatar is under 20k polygons in total it's not a big deal, the render cost goes up a little non-linearly.
Avoid using shapekeys on high polycount meshes. Split meshes to have shapekeys affect as little mesh as possible. This is most commonly going to be a face/body split as the face keys are used all the time.
According to thyrformance (possibly not indicitive of in-game performance) always on shapekeys still affect performance. Heavily. For example if you've adjusted breast size or something. If you have a shapekey customisation that you want on all the time; apply it as the base shapekey in blender.For multiple shapekeys, do it one at a time: Get the shapekey to what you want, hit the little down arrow in the shapekey bit, then hit apply to basis. Do this for each shapekey you would otherwise have on all the time.
Number of Distinct Mesh Objects
Every seperate mesh requires a drawcall to activate. This is a set of instructions that lags the GPU until all
the resources required to render the mesh are loaded and calculated. This happens every frame. Uncombined meshes basically waste GPU time on absolutely nothing and there is usually no reason to have them seperate.
Join meshes in Blender. Use ctrl-j to join your meshes. One except: High poly areas with shapekeys, like the face. Do not join the face to everything else.
Before joining everything like a madman, there are several reasons you'd actually want seperate meshes:
To have different outfits/props.
to save performance on shapekeys. (Not after Unity 2022 hits live)
To reduce the amount of polygons rendering at once.
Actual optimisation is going to be a balancing act between enough meshes to get the functionality you want, without being too laggy. However; when making a maximal optimised avatar at above ~30k polygons you should have only two meshes; the face, and everything else. For avatars that are specifically low polygon, the reduction in drawcalls helps more than the shapekey issue. Balancing act.
Note that only active meshes actually take a drawcall. You could have 10 meshes, but if only face, clothing, body are the three meshes all at once, this will actually perform the same as a 3 mesh avatar. The VRC performance stats can't tell the difference between 10 all at once and just 3.
Minimise meshes that are rendering at the same time
Join meshes
For unjoined meshes, do not have many active at once.
Vertex Count / Poly Count
Fairly intuitive, more polygons the more rendering that needs to be done.
Polygons are also often referred to as verts, so a vertex count can be thought of as an analogous measure, as polygons themselves can be tris, quads, or beyond.
The general rule is to reduce the amount of polygons to a sensible limit. Like all other optimization efforts, there is a balancing act between effort, performance and fidelity. A model with more polygons will usually have more detail, although detail can be added with effects such as normal maps, mat caps and other shader rendering effects. Also keep in mind that shapekeys are per separate mesh object, and the amount of vertexes affects how much computation is needed to process a shapekey when active.
Reducing vertex count can be done in a number of ways, some more time intensive or destructive than others.
Mesh Deletion
The simplest and most effective means of vertex reduction is simply to delete mesh you don't need. This can be excess ribbons, adornments or other features, or deleting mesh that isnt even visible, such as skin under clothing, or layered outfits.
To delete mesh that is part of a mesh object, [>>todo: explain the difference between a mesh object and linked vertexes] select the certexes you want to remove in edit mode and press delete. To help you select mesh the following can be used:
Circle select - c
Box select - b (middle mouse button deselects from current selection)
shift + clicking individual verts
select linked - l and ctrl-l
Different views: wireframe, xray mode
h and alt-h to hide current selection to preview your deletion
knife tools- to cut new vertexes into the mesh for finer deletion
separate into new mesh object - p
You can also delete entire mesh objects, removing them from the model.
When deleting your mesh it is worth also checking the armature to see if any bones were for mesh you just deleted and removing them too as they are now useless.
Also important is that deletion is a destructive process and you should save iterative copies (ctrl-shift-s) so any mistakes can be easily fixed down the line. Trust me on this one.
Decimation
Decimation is another destructive process that forcefully reduces vertex count by automatically merging polygons together. Most useful on suspiciously high polygon clothes, attachments and hair.
To decimate, first separate out the mesh you want to have the polygon count reduced on by selecting it and pressing p.
Then in object mode with the mesh selected, go to the modifiers tab (blue spanner) and find the decimate modifier. Use the modifier to reduce the polygon count. if you get a non zero shapekey error, open the dropdown on the mesh object and delete shapekey data. This will delete all the shapekeys on that mesh.
Decimation is a pretty brutal process but it can be very effective, but keep in mind the following guidance:
Don't decimate the face. it has so many goddamn shapekeys and is what most people will be looking at the most
Hands, fingers and other joints get super fugged by decimation so avoid those areas.
It is often a good policy to not decimate the base skin mesh at all. the topology on that is often efficient already, and you'll likely cause yourself some problems.
Separating Mesh Objects
This is for when you have multiple meshes, such as outfits, but you don't need them on at the same time, such as two different hats, even two entire different outfits.
Why this is optimisation and not just a weird opposite of the earlier message to join meshes, is that your priority with a unity avatar is to reduce the amount of meshes rendering at the same time. Any deactivated game object is not taking up draw calls or other resources, so to have multiple outfits, the optimal play is to have only one rendering at once, one mesh, one outfit; for a total of 3 meshes rendering: face, body, outfit. And with many outfits on the same avatar that can be switched to but only using 3 draw calls at once.
Of course the most optimised is to have just one outfit, merge the body and outfit, delete unwanted mesh [>>todo: example use cases] and not change outfit. But to change outfit you would need to change avatar, and that would make everyone else in the instance reload the entire avatar just to have you put a hat on. The balance between fun and performance should always be a factor in how hard you optimise.
Anyway, the blender part of separating meshes is pretty simple:
Select the mesh you want separate
Press p to make it into a separate mesh object
Give it a name
Make a toggle for it in unity sometime later
Some people will make outfit toggles that are shapekeys which hide the alternate outfit inside their body or something. These people are indeed wrong, but they are saving a draw call or two. However, they are also adding two more performance hogs: the hidden mesh is still rendering and will take frames even though it is hidden inside the avatars. The shapekeys are still requiring calculation on the higher poly mesh of both outfits at once. This usually outweighs the benefits of saving a drawcall. I think- if anyone wants to test how many polygons a drawcall is worth that would be good to quantify.
Retopologising
This is an advanced technique that is for when you are making a from scratch model and want to clean the topology. it will murder your texturing, though. best done before texturing.
Material Count
A material is a set of settings attached to a mesh that gives it texture, bumps, shine, and whatnot. For VRC this is all configured in unity. Optimization wise, unity takes a little extra time rendering an object per extra material on the object. A mesh can consist of any number of materials, causing great latencies in rendering to basically render lots of very small or even materials with the exact same settings.
The goal of optimizing material counts is to get unity to render your avatar more efficiently by combining your materials into fewer materials that it can render in less time.
Merging materials is something you have to balance what you want against paring it down to what you need. First you need to decide what you are going to merge.
Look at your materials and judge which materials can have the exact same settings in unity; these are easy to merge. For example; shoes, skirts, clothing items often just have the exact same settings. Or at least mergeable settings.
You'll sometimes have a LOT of materials from a jacket; like a seperate material for the zipper, the trim, the leather, the ringlets, the inside texture, the metal things on the arm, a chain... Lots of redundant or tiny materials that have just been put on it by whoever made the jacket. These can often be merged into 'classes' of textures. IE you want the metal bits to have a metal effect, and the leather to have a leather effect. In this case you'd merge the metal bits and the leathery bits together.
In the same essence you would not merge your body and your clothing materials together. The skin will want to look skin like, while cloth will want to look cloth like.
does the material use complex mapping/multiple matcaps/normalmaps already in unity? Best not to merge it. More effort than it is worth 90% of the time.
How much you merge is up to you, but it is recommended to do the most merging with the smallest most redundant materials. Literal duplicates, tiny materials with monotextures, they definitely should be merged as it is actually pointless to not.
How to Merge
When a material is merged, you will be merging properties of that material together. The mesh assigned to the material, the textures, the UV maps, these need to be merged together. Merging the textures/UV maps is called Atlasing. Merging the mesh is done last; you create your material with atlased texture/map and
CATS Material Merging Tool:
CATS has a tool in it to merge the materials. What this does is you select a number of materials and it auto-atlases the textures together and creates a new texture and material for you automagically. MAKE A BACKUP SAVE BEFORE DOING THIS.
<todo more usage guidance>
Upsides: Point and click, very fast. Works in a good number of cases. Best for cases where there's lots of tiny materials with shitty little textures rather than combining stuff that's already combined.
Downsides: Very ugly atlasing sometimes. Non-reversible process; it will mangle the fuck out of your materials and if you selected the wrong thing you'd best have a backup save. Or you are VERY fucked. Textures often come with massive amounts of empty space that hurts down the line when you're trying to optimize for VRAM; mostly defeating much of the point of optimizing your materials in the first place.
Manual Merging
More suited to when you have materials with textures that are already 'packed' and reasonably optimal but you want to push them together manually. OR if you attached say, a shoe from one piece of clothing, and a hat from another. You can use this technique to efficiently place the shoe and the hat together onto your clothing material by utilizing unused UV space.
Upsides: more efficient use of UV space, doesn't make abominations because you're doing things manually, more flexible.
Downsides: tedious for lots of tiny materials, and reasonably time consuming.
VRAM usage
Update Nov 2024: VRChat has, in beta, a rendering feature that actually utilizes mipmapping. What this means is that as you run out of VRAM unity will automatically downscale textures and render those instead of the full texture. In theory this means you can use whatever textures you like and people's clients will just render what they can. In practice this might result in stuttering as it downscales, some avatar configurations to get important areas (like the face) mipmapped first, and other things to keep in mind as you build avatars.
Everything your avatar uses to render is stored, relatively uncompressed, inside the VRAM of people's GPUs as they render your avatar. VRAM is a limited resource, and while unity does some dynamic memory pool stuff between RAM and VRAM, when it swaps data between these two locations it is relatively slow. Once VRAM is overloaded rendering slows down significantly and frame rate drops. Therefore for an optimized avatar you will want to reduce the amount of VRAM your avatar uses.
when a texture or mask or map is loaded into unity, you configure what size the image is resized to when bundled into the game asset. The size or type of the image you drag into unity doesn't matter, it's resized as one of the things that unity takes so long on when uploading an avatar.
VRChat now checks for VRAM usage, thankfully, so everyone is going to actually pay attention now. Like you should have been in the first place.
Crunch compression compresses the textures OUTSIDE of VRAM. It affects download size and not how much a texture uses in VRAM. What affects VRAM usage is primarily texture resolution. Compression quality (not crunch!) affects VRAM usage a little, but it is going to be way less effective than lowering the resolution.
Textures and Maps
Materials use image files for texturing, for masks and for maps. They can be set at resolutions in the import settings, and this changes what the image is resized to for the uploaded version of the avatar. Higher resolutions will use more VRAM to render more pixels of the texture. If the texture that was dragged into unity is low quality, assigning a higher resolution won't help.
To access your texture import settings, find the texture file used in the material and view it in the inspector
.
Search for it in your project folder
Find the material, and through the material click on the texture to highlight it in the project folder
Manually look through your texture folder.
Use https://github.com/Thryrallo/VRCAvatarTools to check the VRAM your avatar uses, and deal with the high numbers. Alternatively, VRChat (open beta?) now shows texture usage as part of avatar stats (the difference is that it doesn't show how much VRAM the mesh uses). Everyone else can see these numbers too.
Things to check
Use https://github.com/Thryrallo/VRCAvatarTools to find normal maps, masks, etc that are all causing VRAM usage. (This tool also now grants suggestions on what to lower the resolution/settings on!)
Lower their in-unity import resolution. Remember, a 4K texture uses 4 times as much VRAM as a 2K texture, and a 8K texture uses 16 times as much as a 2K texture, and 16K... we don't talk about that. (64 times more).
Remove mat caps/normal maps/ etc if you don't need them.
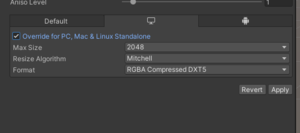
Import settings has a tab in the texture import that allows overrides for windows If you don't need the alpha channel (transparency, IE you have an opaque material), go to PC texture override on the import settings and change the compression format to DXT1 (usually rather than DXT5). You'll see it's RBG rather than RBGA. This should almost halve texture size in VRAM.
Turn off crunch compression and set a texture to 'high' quality compression before upping the texture resolution if you want more detail.
If there's a specific area in your texture you want to have at a higher detail, consider moving the UVs around in blender to expand the area that this detail uses. Examples such as T-shirt decals, tattoos, nipples, etc, can be shifted around so that on a 2k texture they take up more pixels, for more detail.
Menu toggle images. If you have images on your toggles they can take up texture memory too. Downsize the images or remove them; some avatars have like 15MB of toggle images out of the box!
What to aim for
Aim for Under 80MB texture usage (at least for avatars for use in large instances).
The reasoning is follows: Assuming 8GB of VRAM, 80 people will have 100MB each. However, 20MB is used by the mesh, so that's 80 texture, 20 mesh. Now I hear you say, not every instance is 80 person, I'm hiding people using avatar hider etc; The map uses VRAM too. Sometimes a lot. There's no way for me to reliably measure map usage but I bet you some maps are fucking horrendous.
Extra Detail
Adjusting compression quality on import settings
Before considering if you really need that extra texture resolution, try setting 'Compression' (not crunch compression, always turn that off) to "High Quality". It will double the size of the texture but increase the quality of the image. Turning up the resolution will quadruple the size of the texture.
Left: 2k texture, Normal Quality. Uses 2.5MB memory. Right: 2k, High Quality, 5.5MB memory.
Left: 4k texture, Normal quality. Uses 10.7MB memory. Right: 4k, High Quality, 21.3MB memory.
While the 21.3MB one looks best, it doesn't look 15MB better. Easy to settle with the 5.5MB one.
Texture banding
Some textures will have banding if the quality settings are set a certain way, setting a texture to HQ (and lowering resolution!) can mitigate this.
Messing with the UV
If you have a specific object on your texture you want to not be blurry (like the burger stencil above), make it a larger part of the UV. You can do this by rebaking but this is often excessive. Change the size of the detail in the texture, and then move the UV in blender to match that new position. If you have any unused space in the texture due to earlier optimisation, that's an excellent place to expand more detail into. More pixels on the texture crammed into smaller area on your model = higher detail.
Textures you Can't Find
Sometimes Thry's tool will highlight textures you seemingly are not using. Unity saves textures in your material, even if the shader doesn't use it. And it seems like that it even saves it in the material if you replace it with a newer/different texture. Look for an option to see unbound textures and delete them from the material that way.
Examples
That's all well and good but how to actually do it? Here are some (one) case study of examples.
I take a 100k 50 component booth model and do optimization: the results will SHOCK you: Booth_Optimization_example
Concepts
Frame Time
Frame time is the time it takes for the game to produce a frame. When the game tries to draw the game, it does so one frame at a time, and the time it takes to do so affects your FPS. The important difference is that not all frames are drawn equally. Unity's scripting and rendering engine can skip frames to perform calculations like physics, or a mahjong table, or another udon script and perform calculations less often. Theres also sometimes more on screen to generate and render for the GPU. In extreme cases one frame can take exceptionally longer than another.
If a frame gets hung on something like Udon calculations it won't usually get picked up in the FPS stat. Typically they get hung over and over so while you might have 50fps, if you have one frame repeatedly delayed at '10 fps' worth of frametime it will feel far less than 50fps. You can see this in the SteamVR FPS graph. It'll look like one big red spike popping up over a field of lower height bars.
Tools wise:
XSOverlay is good for finding the CPU/GPU frametime balance. It only shows averages at a fairly low fidelity so it could be improved. It recently got updated to show even LESS fidelity but it's data.
fpsVR (https://store.steampowered.com/app/908520/fpsVR/) can record exact frame times and is great for detailed analysis and benchmarking. It also has an overlay for monitoring. It's probably the most technically useful one, but it does cost money.
SteamVR has a show frametime graph option that is good for getting a general feel for the frametime stability.
Tools
Blender - Optimising without opening blender is like vacuuming your house without clearing the floor.
d4rkAvatarOptimizer - A unity tool that can automatically do a few unity-tier optimizations. Doesn't do any magic, it's mostly just a few cleanup utilities that merges some stuff here and there. Which is neat; doing stuff manually all the time is not recommended.