VRChat/Substance Painter
< VRChat
Substance Painter is great software for painting textures and baking AO. However, getting it to work with Unity can be a massive pain in the ass.
| Substance Painter |
|---|
| Software |

|
| MSRP |
| USD $150 |
| Sellers |
So, here's how.
Exporting From
Blender
- Install CATS.
- Ensure you've tweaked the UV atlas as best you can, as you will be unable to use the Auto-Unwrap feature in Substance (rigs get nuked).
- Export as an FBX using CATS.
Importing Meshes
- Open Substance.
- Select File > New...
- Select the Unity HD Render Pipeline (Metallic Standard) template. A pipeline for specular is apparently missing.
- Select the FBX or OBJ you want.
- Set Document Resolution to as much as your PC will suffer. I personally use 4096 for everything.
- Make absolutely certain you're using OpenGL Normal Map Format.
- If your atlas is screwed up and you're OK with nuking rigs/etc, go ahead and check Auto-Unwrap.
- Seams: Will automatically recalculate all seams if set to Recompute All. Recommend leaving this on Generate Only Missing Data unless the model is turbofucked.
- UV Islands: UV Islands are the chunks of mesh thrown onto the atlas. This setting affects whether Substance will automatically re-generate islands (Recompute) or use existing ones.
- Packing: Packing is how well the islands are crammed onto the atlas so they all fit. Substance does an excellent job with this, so if you can, Recompute all. (Don't use for anything with rigging)
- Smack OK and wait.
- Important: Press CTRL+SHIFT+B to bring up the baking window. so you can bake AOs and normals. These are used in Smart Materials.
- In Common Settings:
- Change Output Size to something like half of your document resolution. (2048 in 4096 documents, etc)
- Change Antialiasing to as high as your computer will suffer. I use Subsampling 8x8. This will significantly impact baking time.
- Change Match to By Mesh Name so you get fewer weird ray-tracing issues caused by intersecting with clothing or whatnot.
- Hit OK to Bake. Go grab a coke.
- In Common Settings:
Exporting for Unity
- If you've Auto-Unwrapped anything, export the mesh as an OBJ.
- Select File > Export Mesh...
- Use Without displacement/tesselation.
- Ensure Apply triangulation is checked.
- Select File > Export Textures...
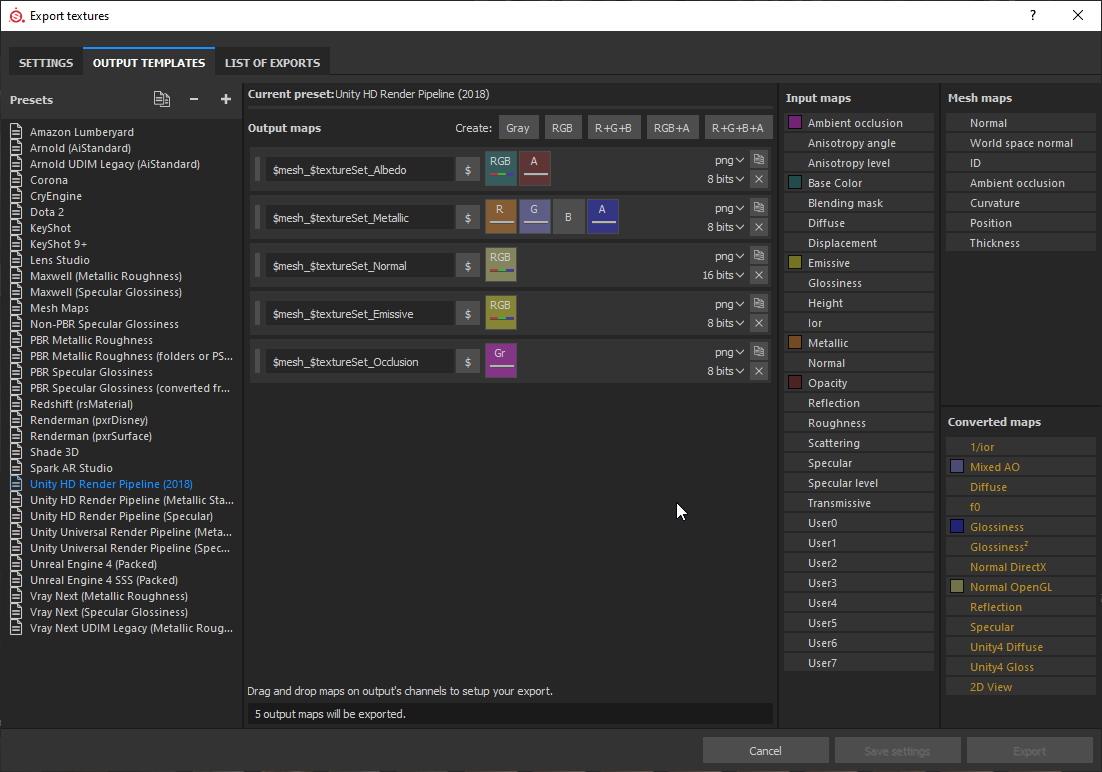
- First, we need to make a Unity 2018 output template. If you've already done this, skip it.
- Go to the Output Templates tab.
- Press the
 button at the top of the left pane to add a new template.
 - Right-click new_export_template.
- Rename it to Unity HD Render Pipeline (2018).
- Now we'll make the Albedo layer texture.
- Click the RGB+A button at the top of the center pane to create a new RGB+A layer.
- Rename RGB Alpha to
$mesh_$textureSet_Albedo. - Drag Base Color from the columns in the pane on the right to the pad labelled RGB.
- Drag Opacity to the A (Alpha) pad.
- Ensure the layer is set to be an 8-bit PNG.
- Now for the Metallic layer.
- Create an R+G+B+A layer.
- Name it
$mesh_$textureSet_Metallic. - Bind Metallic to the R (Red) channel pad.
- Bind Mixed AO to the G (Green) channel.
- Bind Height to the B (Blue) channel.
- Bind Glossiness to the A (Alpha) channel.
- Ensure it's an 8-bit PNG.
- To make the Normal layer:
- Create an RGB layer.
- Rename it to
$mesh_$textureSet_Normal. - Bind Normal OpenGL to the RGB channels.
- Change it to a 16-bit PNG.
- For the Emissive layer:
- Create an RGB layer.
- Rename it to
$mesh_$textureSet_Emissive. - Bind Emissive to the RGB channels.
- Ensure it's an 8-bit PNG.
- Finally, for the Occlusion layer:
- Create a Gray layer.
- Rename it to
$mesh_textureSet_Occlusion. - Bind Ambient Occlusion to the Gr (grayscale) channel.
- Ensure it's an 8-bit PNG.
- Click back to the Settings tab.
- Change Output directory to wherever you want your textures. Recommended:
[Avatar]/Textures. - Change Output template to Unity HD Render Pipeline (2018).
- Change File Type to png / 16 bits.
- Ensure Size is left at Based on each Texture Set's size.
- Ensure Padding is left at Dilation Infinite.
- Click Save Settings and do not panic when the dialog closes.
- Save your project. Recommended:
[Avatar]/Substance/[Avatar].spp - Select File > Export Textures... again.
- Hit Export.

Importing Textures into Unity
- Select your mesh in Assets.
- If you used Auto-Unwrap, use the one you exported from Substance..
- Open the Materials tab.
- Create a folder for materials. Recommended:
[Avatar]/Materials. - Select all the
*_Normaltextures in your textures folder. - Change Texture Type to Normal map.
- Select all your textures.
- In the crunch settings box:
- Set max size to 4096.
- Use Normal Quality compression.
- Check Use Crunch Compression.
- Set Compressor Quality to 90ish.
- Create a new Material to replace a material on your avatar. You will have to do this for every material.
- Click the lock button at the top of the inspector so you don't move around. You'll thank me later.
- Drag the matching
_Albedotexture to the box to the left of the Albedo label. - Similarly, map
_Metallicto Metallic. - Map
_Normalto Normal. - Map
_Occlusionto Occlusion. - If you have an emission layer, check Emission.
- Map
_Emissionto the Emission Color.
- Map
- If you have Opacity in your albedo, fiddle with Rendering Mode until it looks OK.